Quick Start Guides to Teams Desk Phones
For helpful guides and articles to help familiarize yourself with your Teams desk phone, start by selecting your phone below.

Yealink MP52 E2
The following figure displays the hardware features of the MP52 (E2) phones.

| No. |
Item |
Description |
| 1 |
Power LED Indicator |
Indicate phone statuses. |
| 2 |
Line Keys |
/ |
| 3 |
Soft Keys |
Access the function above the soft keys on the screen.
The soft keys change depending on what you are doing at the time. |
| 4 |
Navigation Keys |
Scroll through information or options displayed on the screen. |
| 5 |
Mute Key |
Toggle the microphone on or off. |
| 6 |
Headset Key |
Toggle the headset on or off. |
| 7 |
Message Key(MP52)
Transfer key (MP52 E2) |
Message key: Access your voice messages.
Transfer key: Transfer a call. |
| 8 |
Redial Key |
Redial a dialed number. |
| 9 |
Speakerphone Key |
Enable you to place and receive calls using the speakerphone. |
| 10 |
Volume Key |
Adjust the handset volume, headset, speaker, and orringer. |
| 11 |
Keypad |
Enable you to enter numbers, letters, and special characters. |
| 12 |
Reversible Tab |
Secure the handset in the handset cradle when the phone is mounted vertically. |
| 13 |
Speaker |
Provide audio output during hands-free. |
Making Calls
Call Contacts
- From the Calls screen, select
 beside the contact or
  key.
key.
- From the VOICEMAIL screen, select the voicemail record that you want to call, and select .
- From the PEOPLE screen, select the desired contact, and select key.
Dial a Number
- Pick up the handset.
- Press the Speakerphone key.
- Press the HEADSET key.
- Press the keypad.
- Enter the contact number
- Press the key
Place Multiple Calls
You can hold your current call and place a new call when you are on a call. Only one active call (the call that has audio associated with it) can be in progress at any time.
Procedure
- During a call, select
 key to return to the VOICEMAIL screen.
You can place the call directly if the people you want to call are in the voicemail record.
- Select
 to return to the home screen and choose the way to call contacts.
The active call is placed on hold, and the new call is set up.
Place a Call from Call History
You can place calls to contacts from the call history list containing incoming, outgoing, and missed calls.
Procedure
- Go to Calls > RECENT screen, select the desired contact.
- Press the key.
Redial a Number
You can recall the last contact you called when your phone is idle.
Procedure
- Press the REDIAL key

Place a Call from Voicemail
- From the Voicemail screen, select the voicemail record that you want to call.
- Press the OK key.
- Select
 to place an audio call.
Place an Emergency Call from a Locked Phone
Once the phone is locked, you can dial an emergency number without having to unlock it.
- Pick up the handset.
- Press the Speakerphone key.
- Press the HEADSET key.
- Press the keypad and select Emergency Call.
- Enter an emergency number and select the call icon to place the call.
Perform a Blind Transfer
You can transfer calls to other contacts immediately without consulting with them first.
Procedure
- During a call, select
 > Transfer now.
- The call is placed on hold.
- Select the desired contact or search for a contact.
- Then the call is connected to the contact to which you are transferring.
- Select
 to end the call, or it will end automatically when the other party picks up.
Perform a Consultative Transfer
You can transfer calls to other contacts after consulting with them first.
Procedure
- During a call, select > Transfer > Consult first.
- Select the desired contact or search for a contact.
- After the party answers the call, select
 > Transfer beside the contact. It prompts you to transfer the call or not.
- Select OK to complete the transfer.
- After the transferred party answers the call, the call is transferred successfully.
For more information on this phone, please visit:
Yealink Support

Yealink MP56 E2
The following figure displays the hardware features of the MP56 (E2) phones. The table lists each feature numbered in the figure.
| No. |
Item |
Description |
| 1 |
Power Indicator LED |
Indicate phone statuses. |
| 2 |
Touch Screen |
7 inches (800 x 480) capacitive (5 points) touch screen, tap to select items and navigate menus. |
| 3 |
HEADSET Key |
Enable you to place and receive calls through a headset. The LED indicator glows green when the headset is activated. |
| 4 |
MUTE Key |
Mute local audio during calls and conferences. The LED indicator glows red when the mute feature is activated. |
| 5 |
Teams Key |
Initiate a Teams conference call by meeting now. |
| 6 |
Speakerphone Key |
Enable you to place and receive calls using the speakerphone. The LED indicator glows green when the speakerphone is activated. |
| 7 |
TRANSFER Key |
Transfer a call. |
| 8 |
HOLD Key |
Place a call on hold or resume a held call. |
| 9 |
REDIAL Key |
Redial a dialed number. |
| 10 |
Volume Key |
Adjust the volume of the handset, headset, speaker, or ringer. |
| 11 |
Keypad Keys |
Enable you to enter numbers, letters, and special characters. |
| 12 |
Speaker |
Provide audio output during hands-free. |
| 13 |
Reversible Tab |
Secure the handset in the handset cradle when the phone is mounted vertically. For more information on how to adjust the reversible tab, refer to Yealink Wall Mount Quick Installation Guide for Yealink IP Phones. |
Making Calls
Call Contacts
- From the Calls screen, tap

- Enter the contact account information to search for the desired contact.
- Tap
 beside the contact to place an audio call.
You can tap

to search for a contact.
Dial a Number
- Pick up the handset.
- Press the Speakerphone key.
- Press the HEADSET key.
- Tap
 on the Calls screen.
- Enter the contact number
- Tap beside the contact to place an audio call.
Place Multiple Calls
You can hold your current call and place a new call when you are on a call. Only one active call (the call that has audio associated with it) can be in progress at any time.
Procedure
- During a call, tap
 to return to the Calls screen.
- Tap
 on the Calls screen or tap
  to search and then dial out the contact.
- The active call is placed on hold, and the new call is set up.
Place a Call from Call History
You can place calls to contacts from the call history list containing incoming, outgoing, and missed calls.
Procedure
-
Go to Calls > RECENT screen, select the desired contact.
-
Select  to place an audio call.
Redial a Number
You can recall the last contact you called when your phone is idle.
Procedure
- Press the REDIAL key
Place a Call from Voicemail
- From the Voicemail screen, select the voicemail record that you want to call.
- Select to place an audio call.
Place an Emergency Call from a Locked Phone
Once the phone is locked, you can dial an emergency number without having to unlock it.
-
Pick up the handset.
- Press the Speakerphone key.
- Press the HEADSET key.
- Tap
 on the touch screen and select Emergency Call.
- Enter an emergency number and select the call icon to place the call.
Perform a Blind Transfer
You can transfer calls to other contacts immediately without consulting with them first.
Procedure
- During a call, go to Transfer > Transfer now.
You can also press 
- The call is placed on hold.
- Select the desired contact or search for a contact.
- Then the call is connected to the contact to which you are transferring.
- Select to end the call, or it will end automatically when the other party picks up.
Perform a Consultative Transfer
You can transfer calls to other contacts after consulting with them first.
Procedure
- During a call, go to Transfer > Consult first.
You can also press 
- Select the desired contact or search for a contact.
- After the party answers the call, tap
 beside the contact.. It prompts you to transfer the call or not.
- Select OK to complete the transfer.
- After the transferred party answers the call, the call is transferred successfully.
For more information on this phone, please visit:
Yealink Support
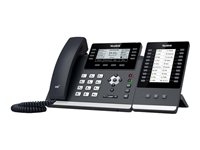
Yealink MP56 E2 with Sidecar
Note: Please see previous section to learn how to use the phone. This section will focus on the sidecar functionality.
Configuring the Contacts
By default, the EXP50 Sidecar will pull contacts that are added to your Teams “Speed Dials” contact group. Any additional contacts you add to Speed Dials will also push to the EXP50 Sidecar.
Adding to Speed Dials on Teams desktop Client:
-
Open the Teams desktop application
-
Under Calls > Contacts/History, click the 3 dots on the desired contact.
-
Select “Add to Speed Dial”
-
You can also add contacts from your O365 tenant’s directory by going to the Teams Desktop Client > Calls > Click the “Add Contact” symbol next to “Speed Dials”

-
If you wish to add other Contact Groups from your Teams Contacts to the sidecar, on the Teams deskphone / host phone you will need to navigate to People > Select the contact group dropdown > Select the group you wish to add to the sidecar > Select the vertical ellipsis (⋮) to the right of the Contact Group name, then choose “Pin to Sidecar”.


This will push the contacts in that group to the attached EXP50 sidecar.
To remove a group of contacts from the sidecar, follow the same steps but then select “Unpin Group from Sidecar”.
Note: NOTE: any contacts added to the EXP50 sidecar, whether by Speed Dials group or pinned Contact Groups, will appear on the Sidecar in the order you assigned them, not in alphabetical order or by group. Some changes to the sidecars may not appear until you have rebooted the host phone.

Yealink MP50

| Item |
Description |
| Power LED Indicator |
Indicates phone status. |
| Touch Screen |
Allows you to select items and navigate menus on the touch-sensitive screen. |
| HEADSET Key |
Toggles and indicates the headset mode.
The key LED glows green when headset mode is activated. |
| MUTE Key |
Toggles and indicates mute feature.
The key LED glows red when the call is muted. |
| Speakerphone Key |
Toggles and indicates the hands-free (speakerphone) mode.
The key LED glows green when the hands-free (speakerphone) mode is activated. |
| Keypad |
Provides the digits and special characters in context-sensitive
applications. |
| Speaker |
Provides hands-free (speakerphone) audio output. |
| Teams Key |
• Hold for 2 seconds to activate Cortana integrated in Teams (this requires Microsoft's support).
• Press once to invoke the Teams client in the idle state. |
| Volume Key |
Adjusts the volume of the handset, headset, and speaker. |
| USB 3.0 Port |
Allows you to connect a USB headset/USB flash drive/Bluetooth dongle
BT50 and so on. |
Basic Calls
| Function |
Action |
| Place a new call |
- Tap the connected device CARD or  . .
- Enter the desired number.
- Select the desired outgoing dialing device.
- Tap Call. |
| Answer call |
Tap  . . |
| End call |
Tap  . . |
| Reject call |
Tap  . . |
| Hold call |
Tap  . . |
| Resume call |
Tap Resume. |
| Mute/un-mute microphone |
Tap  / / on the screen or press the MUTE key. on the screen or press the MUTE key. |
| Place a new call during a call |
Tap  . . |
Multiple Calls
The phone can accept and handle multiple calls at the same time.
| Function |
Action |
| End the current call and answer the incoming call |
Tap  and then tap . and then tap . |
| Put the current call on hold and answer the incoming call |
Tap on the phone. |
| Switch between held call and active call |
Tap  on the phone. on the phone. |
| Reject incoming call while on a current call |
Tap on the phone. |
Merge Two Calls
You can merge two calls into one conference call.
Before you begin: There are two calls on the phone, and one of them is on the connected USB device.
- Tap
 > Merge Calls.
- To split the conference, tap > Split Conf.
Adjust Playback Volume
Do one of the following to adjust MP50 volume:
General Settings
- In the Phone
Go to Settings > Basic Settings > General.
- In the Yealink USB Connect
- Open the Yealink USB Connect software and select the desired device CARD.
- Go to Device settings > Basic Settings > General.
| Functions |
Description |
| Language |
Select the screen text language from a list of 15 languages. |
| Time&Date |
Set the time and date manually.
• Time Format: 12 Hour/24 Hour can be selected on the device.
Default: 24 Hour.
• Date Format: Day, Month/Month, Day can be selected on the device.
Default: Month, Day.
• Manual Time: Enable this function to set the date and time manually. |
| Busylight |
Set the busylight status or turn off the busylight.
• Sync (the status depends on the softphone Presence status)
• Available (LED glows green when the device is not in a call or not ringing)
• DND (LED glows red when the device is not in a call or not ringing)
• Off (LED is off)
NOTE
It appears only when you connect the Busylight BLT60 to the phone.
|
Display Settings
- In the Phone
Go to Settings > Basic Settings > Display.
- In the Yealink USB Connect
- Open the Yealink USB Connect software and select the desired device CARD.
- Go to Device settings > Basic Settings > Display.
| Functions |
Description |
| Backlight/Backlight Active Level |
Set the backlight active level and backlight time. |
| Screensaver |
Change the waiting time for the screen saver. |
| Teams User Name |
Configure whether the Teams user name displays on the home screen when the device disconnects with PC.
• Personal Mode (default): Display the Teams user name when the device disconnects with PC.
• Hot Desking Mode: Do not display the Teams user name when the device disconnects with PC. |
| Dark Theme |
Turn on/off dark theme.
The dark theme changes the default bright background color to a darker color, which is easier on the eyes in low-light environments or if you prefer less bright screens. |
| Screensaver Wait Time |
Change the waiting time for the screen saver. |
| Screensaver Background |
Set whether to display the built-in or the custom screensaver. |
Sound Settings
- In the Phone
Go to Settings > Basic Settings > Sound.
- In the Yealink USB Connect
- Open the Yealink USB Connect software and select the desired device CARD.
- Go to Device settings > Basic Settings > Sound.
| Functions |
Description |
| Ring Tones |
Enable/disable the phone to play a built-in tone while receiving an incoming call. |
| Dial Tone |
Enable/disable the paired headset to play a dial tone when entering the dialing screen. |
| Keypad Tone |
Enable/disable the paired headset to produce a sound when pressing the keypad keys. |
| Speaker Volume |
Adjust the playback volume. |
For More Information on this phone, please visit:
Yealink Support
Need More Help?
Connect with PVCC Technology Services:
434.961.5400
help@pvcc.edu
Room M832 in the Main Building (Campus Map)